 すべて展開
すべて展開 すべて折りたたむ
ここでは、本製品のイベントに処理を実装する手順について説明します。以下の例では、Smtpコンポーネントがデータを送受信したときに発生するConnection.Logイベントを使用します。
「フォームに貼り付けて使用する」で作成したプロジェクトを利用して、イベント処理の実装手順を説明します。
-
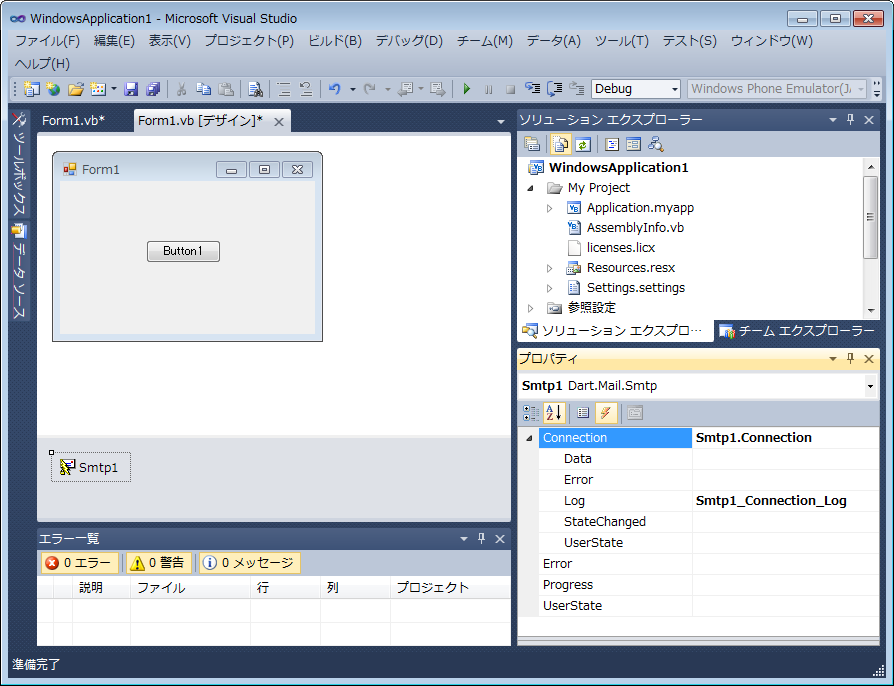
Visual Studio上で、Form1のデザイン画面を表示します。
-
コンポーネントトレイに表示されている「Smtp1」([Visual C#]の場合は「smtp1」)を選択すると、プロパティウィンドウ上に「Smtp1」のプロパティが表示されます。
プロパティウィンドウ上の[イベント]アイコン(稲妻のアイコン)をクリックすると、利用できるイベントが表示されます。 -
プロパティウィンドウ上で[Connection]の下の[Log]イベントをダブルクリックすると、Connection.Logイベントのイベントハンドラがコードに追加されます。
-
追加されたConnection.Logイベントのイベントハンドラに、実行する処理のコードを記述します。以下の例では、サーバーとSmtpコンポーネントとの間で送受信されたコマンドを出力するコードを記述しています。
Private Sub Smtp1_Connection_Log(sender As System.Object, e As Dart.Mail.DataEventArgs) Handles Smtp1.Connection.Log
  ' 送受信したコマンドのログを出力します。
  System.Diagnostics.Debug.WriteLine(e.Data.ToString())
End Sub
private void smtp1_Connection_Log(object sender, Dart.Mail.DataEventArgs e)
{
  // 送受信したコマンドのログを出力します。
  System.Diagnostics.Debug.WriteLine(e.Data.ToString());
}
-
[デバッグ]メニューの[デバッグ開始]を選択すると、アプリケーションがビルドされ、実行されます。
フォーム上のボタンをクリックすると、イミディエイトウィンドウにSmtpコンポーネントが送受信したコマンドのログが出力されます。
「参照設定に追加して使用する」で作成したプロジェクトを利用して、イベント処理の実装手順を説明します。
-
Visual Studio上で、Form1のコード画面を表示します。
-
Visual Basicの場合、Smtpコンポーネントのインスタンスを生成するコードに、WithEventsキーワードを追加します。
C#の場合、Form1クラスのコンストラクタに、Connection.Logイベントのイベントハンドラを追加するコードを記述します。' Smtpコンポーネントのインスタンスを生成します。 Dim WithEvents Smtp1 As New Dart.Mail.Smtp()
public Form1()
{
  InitializeComponent();

  // Connection.Logイベントのイベントハンドラを追加します。
  this.smtp1.Connection.Log += new System.EventHandler<Dart.Mail.DataEventArgs>(this.smtp1_Connection_Log);
}
-
Form1クラスに、Connection.Logイベントのイベントハンドラのコードを記述します。以下の例では、サーバーとSmtpコンポーネントとの間で送受信されたコマンドを出力するコードを記述しています。
Form1クラスのコードは、最終的に以下のようになります。Public Class Form1 ' Smtpコンポーネントのインスタンスを生成します。 Dim WithEvents Smtp1 As New Dart.Mail.Smtp() Private Sub Button1_Click(sender As System.Object, e As System.EventArgs) Handles Button1.Click ' 接続するSMTPサーバーとポート番号を指定します。 Smtp1.Session.RemoteEndPoint = New Dart.Mail.IPEndPoint("myMailServer", Smtp.GetDefaultPort(Smtp1.Session)) ' 認証が必要な場合には、ユーザー名とパスワードも設定します。 Smtp1.Session.Username = "myUsername" Smtp1.Session.Password = "myPassword" ' 認証方式を設定します。 Smtp1.Session.Authentication = Authentication.Login ' メールを送信します。 Smtp1.Send("to@test.com", "from@test.com", "メールの件名", "メールの本文") ' SMTPサーバーとの接続を閉じます。 Smtp1.Close() End Sub Private Sub Smtp1_Connection_Log(sender As System.Object, e As Dart.Mail.DataEventArgs) Handles Smtp1.Connection.Log ' 送受信したコマンドのログを出力します。 System.Diagnostics.Debug.WriteLine(e.Data.ToString()) End Sub End Class
public partial class Form1 : Form
{
  // Smtpコンポーネントのインスタンスを生成します。
  Dart.Mail.Smtp smtp1 = new Dart.Mail.Smtp();

  public Form1()
  {
    InitializeComponent();

    // Connection.Logイベントのイベントハンドラを追加します。
    this.smtp1.Connection.Log += new System.EventHandler<Dart.Mail.DataEventArgs>(this.smtp1_Connection_Log);
  }

  private void button1_Click(object sender, EventArgs e)
  {
    // 接続するSMTPサーバーとポート番号を指定します。
    smtp1.Session.RemoteEndPoint = new Dart.Mail.IPEndPoint("myMailServer", Smtp.GetDefaultPort(smtp1.Session));

    // 認証が必要な場合には、ユーザー名とパスワードも設定します。
    smtp1.Session.Username = "myUsername";
    smtp1.Session.Password = "myPassword";

    // 認証方式を設定します。
    smtp1.Session.Authentication = Authentication.Login;

    // メールを送信します。
    smtp1.Send("to@test.com", "from@test.com", "メールの件名", "メールの本文");

    // SMTPサーバーとの接続を閉じます。
    smtp1.Close();
  }

  private void smtp1_Connection_Log(object sender, Dart.Mail.DataEventArgs e)
  {
    // 送受信したコマンドのログを出力します。
    System.Diagnostics.Debug.WriteLine(e.Data.ToString());
  }
}
-
[デバッグ]メニューの[デバッグ開始]を選択すると、アプリケーションがビルドされ、実行されます。
フォーム上のボタンをクリックすると、イミディエイトウィンドウにSmtpコンポーネントが送受信したコマンドのログが出力されます。