このセクションでは、C1MaskedTextField コントロールを Android アプリケーションに追加し、[社会保障番号]、[生年月日]、[電話番号]、[識別]の 4 つの入力フィールドを指定します。[社会保障番号]入力フィールドはハイフンで区切られた 9 桁の数字を、[生年月日]フィールドは yyyy/mm/dd 形式の日付を、[電話番号]フィールドは局番を含む 10 桁の数字を、[識別]フィールドは都道府県の郵便番号の短縮形を受け取ります。
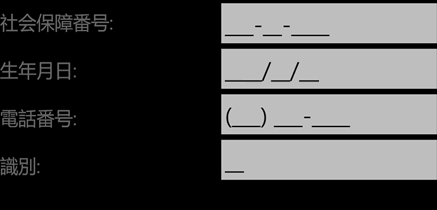
次の図は、上記の手順を実行した後の入力フィールドを示しています。
C1MaskedTextField コントロールを使用して 4 つの入力フィールドを初期化するには、次のコードを .axml ファイルに追加します。
| XML |
コードのコピー
|
|---|---|
<?xml version="1.0" encoding="utf-8"?> <GridLayout xmlns:android="http://schemas.android.com/apk/res/android" xmlns:tools="http://schemas.android.com/tools" xmlns:app="http://schemas.android.com/apk/res-auto" android:layout_width="match_parent" android:layout_height="wrap_content" android:columnCount="2" android:paddingBottom="20dp" android:paddingLeft="20dp" android:paddingRight="20dp" android:paddingTop="20dp" android:rowCount="4"> <C1.Android.Input.C1MaskedTextView android:id="@+id/idMask" android:layout_width="300dp" android:layout_height="wrap_content" app:c1_mask="999 99-0000" app:c1_promptChar="_" /> <C1.Android.Input.C1MaskedTextView android:id="@+id/dateMask" android:layout_width="300dp" android:layout_height="wrap_content" app:c1_mask="0000/90/90" app:c1_promptChar="_" /> <C1.Android.Input.C1MaskedTextView android:id="@+id/phoneMask" android:layout_width="300dp" android:layout_height="wrap_content" app:c1_mask="(999)000-0000" app:c1_promptChar="_" /> <C1.Android.Input.C1MaskedTextView android:id="@+id/stateMask" android:layout_width="300dp" android:layout_height="wrap_content" app:c1_mask="LL" app:c1_promptChar="_" /> </GridLayout> |
|